

Pairing UI
Your POS must provide a user interface for pairing and viewing the pairing status.
Important to know:
- Make sure you have read the previous guide: Pairing.
- SPI can be used with any JavaScript front-end framework, including React, Vue.js, Angular, and jQuery.
- All requirements in this guide are indicated by requirement IDs (e.g. ‘Req. PUI1’).
Sample UI
Here is an example of a pairing UI that shows each screen of the UI as well as several of the transitions between screens. This example meets our requirements which are explained in this guide.
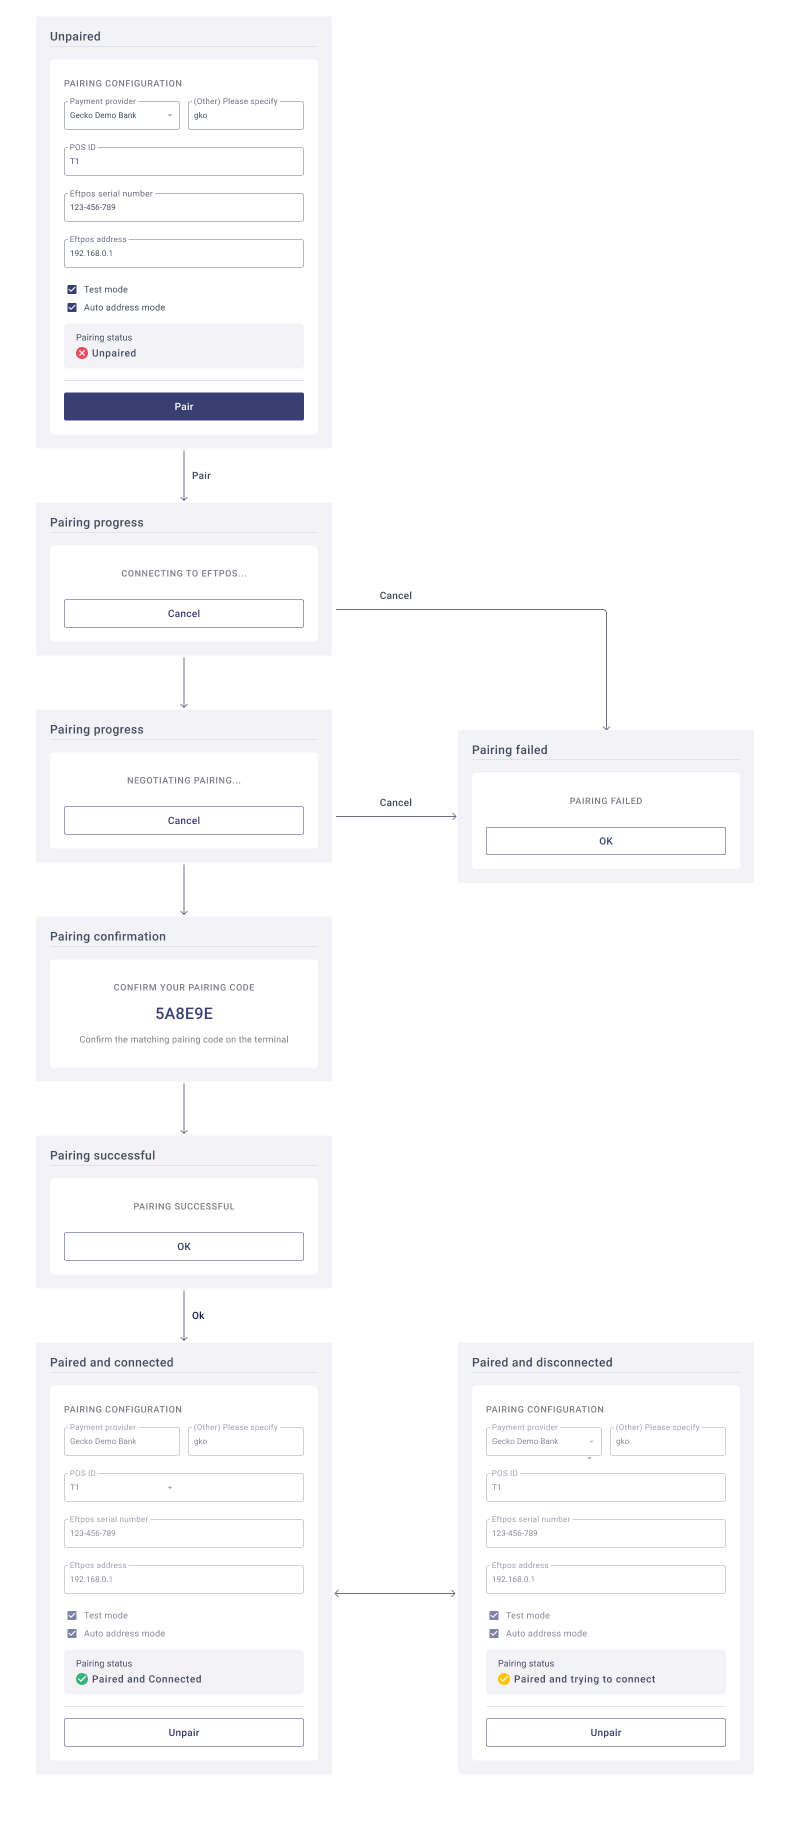
Unpaired screen
This screen displays when the EFTPOS terminal is not currently paired (Req. PUI1). It should be shown when the ‘StatusChanged’ event contains the Unpaired status.
On this screen, there is a form for entering the details of the terminal to pair and a button to start the pairing process. This form is where the merchant will enter the pairing details that are used to set up SPI.
The requirements of each form component is as follows.
| Payment provider selection list (Req. PUI2) | This is the list of tenants that you stored during setup. It only allows a single selection. |
| Other payment provider text field (Req. PUI3) | This text field allows the user to enter any tenant code (e.g. “abc”) instead of selecting from the payment provider list. Commonly, the ‘Payment provider' list includes an 'Other' option which, when selected, displays the 'Other payment provider’ field. |
| POS ID text field (Req. PUI4) | This text field can only contain letters and numbers and must be 16 characters or less. |
| Serial number text field (Req. PUI5) | This text field should not have any validation to restrict the number of characters. |
| EFTPOS address text field (Req. PUI6) | This text field accepts a valid IP address or FQDN address. |
| Auto address option | This is a boolean. Note that this UI component is optional — you may decide not to allow this option to be configured by the merchant. |
| Save button | This button applies the details entered into the pairing form to the SPI instance. It calls the save function in the set up SPI code sample.Note that this UI component is optional — you may decide to add this functionality to the ‘Pair’ button. |
| Test mode option (Req. PUI7) | This is a boolean. This option should not display when the POS is in production mode. |
| Pair button (Req. PUI8) | This button starts the pairing process using the details entered into the form. This button cannot be clicked (it is ‘greyed out’) unless all the form fields have been entered. Therefore, all the form fields are required fields. |
Pairing progress screen
This screen displays when the EFTPOS terminal is in the process of pairing (Req. PUI9). It should be shown when the 'StatusChanged' event contains the PairedConnecting status.
On this screen, there is a progress update that displays the various messages from the 'PairingFlowStateChanged' event.
There is also a Cancel button that calls spi.PairingCancel()
Pairing confirmation screen
This screen displays when the EFTPOS terminal is asking for the user to confirm the confirmation code (Req. PUI10). It should be shown when the 'PairingFlowStateChanged' event contains AwaitingCheckFromPos: true
On this screen, the confirmation code is displayed (the event's ConfirmationCode). It should also tell the merchant to confirm on the terminal that the same pairing code is displayed.
Confirming the code on the POS is not needed in the latest versions of SPI and, therefore,spi.PairingConfirmCode()is now a legacy function.
Pairing successful screen
This screen displays when pairing succeeds (Req. PUI11). It should be shown when the 'PairingFlowStateChanged' event contains Finished: true and Successful: true
On this screen, there is a message that tells the user that pairing was successful and there is a button that takes the user to the Paired screen. Note that this screen can alternatively be designed as a pop-up.
Pairing failed screen
This screen displays when pairing fails or is cancelled by the user (Req. PUI12). It should be shown when the 'PairingFlowStateChanged' event contains Finished: true and Successful: false
On this screen, there is a message that tells the user that pairing failed and there is a button that returns the user to the Unpaired screen.
Paired screen
This screen displays when the EFTPOS terminal is currently paired (Req. PUI13). It should be shown when the 'StatusChanged' event contains the PairedConnected status.
This screen is similar to the Pairing screen but none of the form's fields and components can be clicked (they are 'greyed out') except for the Unpair button.
When Unpair is clicked, it calls spi.Unpair() to unpair from the terminal then returns the user to the Unpaired screen.
Paired and disconnected screen
This screen displays when the EFTPOS terminal is paired but disconnected from the EFTPOS terminal (such as during a network disconnection) (Req. PUI14). It should be shown when the status of the 'StatusChanged' event changes from PairedConnected to PairedConnecting
This screen is the same as the Paired screen but the Pairing status message says that the terminal is paired and trying to connect, and also, the EFTPOS address field is editable.
Updated 9 months ago