

Pay at Table
Pay at table allows merchants to make transactions from the EFTPOS terminal instead of the POS, hence allowing them to make purchases away from their desk.
Important to know:You must first develop your integration and get it certified. Pay at table must be developed at the end and certified separately.
Introduction
An example of Pay at table is at a restaurant when the waiter comes to your table with an EFTPOS terminal for you to pay your bill. This is convenient because you don't need to go to the POS at the desk to make your payment. But Pay at table is not only used in restaurants; it's used in many cases where the merchant needs to make transactions while walking around their establishment.
Here is an example of using Pay at table for a customer who orders $100 of food to their table.
Normally, the POS starts transactions using the Spice API, but when Pay at table is enabled, the EFTPOS terminal starts transactions instead.
Develop Pay at table
Pay at table is an advanced feature that requires you to develop a database, an API, and a UI.
To understand how it works, let's use the previous example. When the waiter comes to your table, they enter your table number into the EFTPOS terminal. The terminal displays the bill for your table and you can then pay the bill.
The table and bill data are stored in your integration, and it provides an API that Spice uses to get this data and pass it to the terminal. The integration POS also provides a UI for managing tables.
Table database
Pay at table requires your integration to store several fields of data. Here is an example of a database containing these fields, but you may choose to store additional fields or even use a different database structure.
| Operators These are the users who have access to making payments from the terminal. | |
| Operator ID | A unique string that identifies the operator. This string must only contain numbers since some terminals don’t accept other characters. |
|---|---|
| Tables These are the restaurant tables, hotel bookings, or another way of representing the customer. | |
| Table ID | A unique string that identifies the table; usually numbers are used. |
|---|---|
| Label | A string that can be used to identify the table, e.g. “long table at the back”. |
| Is locked? | When ‘true’, the table is ‘locked’, preventing any transactions for the table. |
| Operator ID | The operator who created the table. |
| Bill ID | A foreign key. A table has a single bill. |
| Bills A bill contains the amount owed and paid by a table. | |
| Bill ID | A unique string that identifies the bill. |
|---|---|
| Total amount | The full amount of money that needs to be paid or was paid. |
| Outstanding amount | The amount of money that has not yet been paid. |
| Payments A payment that has been made to pay a bill. | |
| Bill ID | A foreign key. A bill can have zero to many payments. |
|---|---|
| Amount | The amount of money paid. |
| Payment type | This can be either “cash” or “card”. |
Table API
Your integration must provide an API with several endpoints that follow our specifications. Spice will call this API to access the table’s data and pay bills. You can find the specifications at the following links.
- GET /v1/ping
- GET /v1/tables
- GET /v1/tables/{tableId}
- GET /v1/bills/{billId}
- POST /v1/bills/{billId}
- GET /v1/operators
While a bill is being paid, ensure to 'lock' the table (set ‘Is locked?’ to ‘true’) to prevent other terminals from making payments for the same table. This prevents duplicate payments. After the payment is complete, 'unlock' the table.
Table UI
Your integration must also provide a UI for the merchant to manage their tables, bills, and operators from the POS. The table UI should make it easy to view the open tables and perform actions on them.
Your UI must allow the user to perform the following actions.
| Open a table | Create a new table. |
| Close a table | Remove an existing table. It will no longer be returned by the Table API. |
| Edit bill | Change the total amount of a bill. |
|
Create operator (optional) |
Create a new operator. |
|
Remove operator (optional) |
Remove an operator. |
Locking and unlocking tables must not be supported by the UI; it must only be performed by the terminals. This is because locking/unlocking tables from the POS can introduce issues such as duplicate payments.
Use Pay at table
After you have developed the Pay at table feature for your integration, it's time to start using it.
Enable Pay at table mode
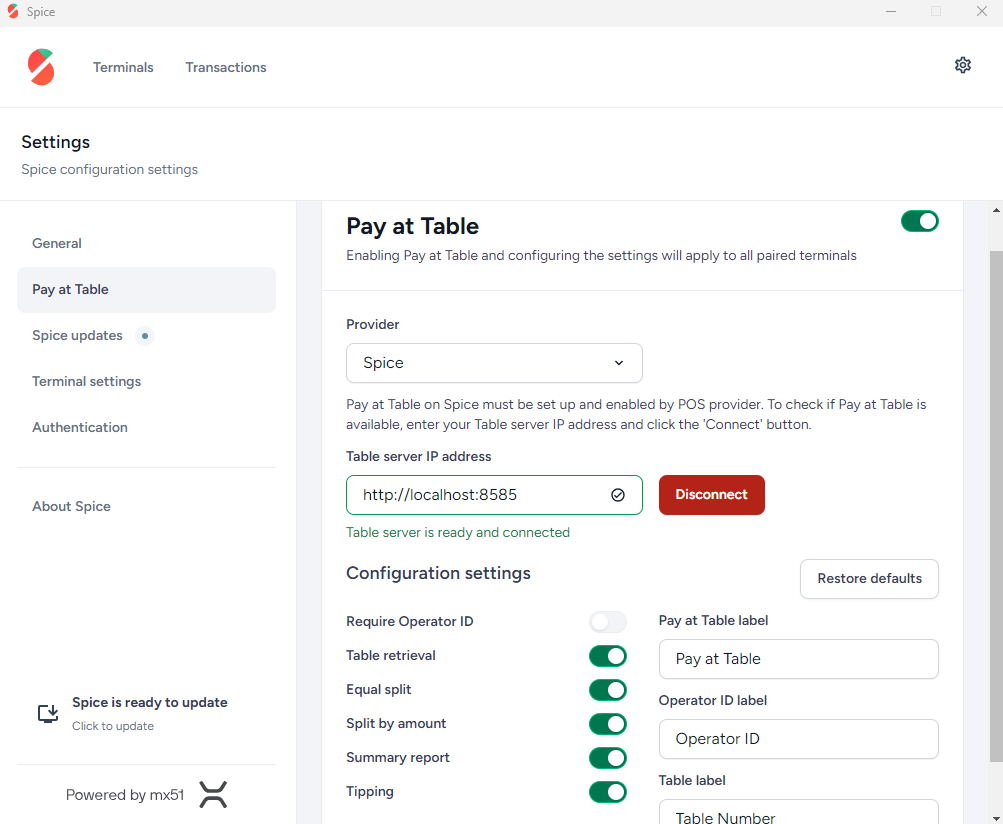
In Spice, click the Settings tab > Pay at Table > enable the Pay at table option.
Pair multiple terminals
See the multi-terminal guide for more information and instructions on pairing multiple terminals.
Make a payment from the terminal
You can now use this feature to make transactions from the terminal.
- On the POS, create an operator and open at least one table.
- On your Gecko Bank terminal, click the Pay at table button.
- Enter the Operator ID.
- Required only when Require Operator ID is enabled on Spice.
- Enter the Table number (the Table ID).
- Proceed to make the payment.
Table locking
These table locking guidelines provide instructions for effectively managing table locking and unlocking mechanisms for the 'Pay at Table' functionality using Spice Pay at Table. It specifically caters to the regular challenges, use cases and optimal strategies linked to maintaining table statuses and avoiding mishaps during payment transactions. Effective table locking will help avoid potential pitfalls like duplicate payments to a single table or continuous 'locking' or 'unlocking' of tables, thus ensuring smooth and error-free workflows.
Table Locking Mechanics
When a table is locked, other terminals trying to access the table will receive an error. A POS may choose to embed a feature to unlock a table but this should only ever be used for recovery scenarios, such as if the terminal crashes or encounters network issues. This feature should be locked down to require a password or some form of elevated authorisation in order to prevent some unwanted scenarios. The UX is at the discretion of the POS.
Handling Table Locking Scenarios
To manage table locking, ensure that the POS Frontend (FE) controls the user experience to prevent or handle the following scenarios:
Scenario 1: Unlocking a table from the POS and adding items to the table whilst a terminal is already taking payment
- The terminal operator will be alerted to a new outstanding amount (once the transaction is completed) if the bill amount changes whilst a transaction is in progress.
Scenario 2: Unlocking a table from the POS allowing it to be pulled to another terminal whilst a terminal is taking payment
- This can result in duplicate payments being taken across two terminals simultaneously.
Locking and Unlocking Tables
When the terminal calls the GET Table method, the POS should lock the table. The table should be unlocked again when the POST Update Bill method with the "end" property is called. Ensure that there is always a POST Update Bill to unlock the table to prevent locking a table and not being able to unlock it.
Error Messages
When a table is locked, the Get Table method should return the property "Locked".
Managing Table Locking in the POS
The POS should have the ability to unlock a table through its management tools, but this feature should be password protected or have some form of elevated authorisation and a warning in order to access it. Encouraging payments while a table is locked elsewhere may lead to unknown results at the POS. To manage table locking and unlocking during the payment process, consider the following guidelines:
- Lock the table during the GET Table call when the path parameter "tableid" is present.
- Unlock the table during the POST Update Bill call when the "end" property is present.
api.get("/v1/tables/:tableId", (req, res) => {
    const { tableId } = req.params;
    const { operatorId = null } = req.query;
    const { tables, bills, operatorIdList = null } = db.get();

    const table = tables.find(t => t.tableId === tableId);
    if (!table) {
        return res.status(404).json({ error: "NOT_FOUND" });
    }
    if (
        operatorId !== null &&
        operatorIdList !== null &&
        operatorIdList.length > 0 &&
        table?.operatorId !== operatorId
    ) {
        return res.status(404).json({ error: "NOT_FOUND" });
    }

    let bill = bills.find(t => t.billId === table.billId);
    if (!bill) {
        return res.status(404).json({ error: "BILL_NOT_FOUND" });
    }

    // if table is already locked, just return locked = true without any bill details
    if (table.locked) {
        return res.json({ tableId, locked: true, bill: {} });
    }

    table.locked = true;
    db.sync();

    const { label, locked } = table;
    bill = computeBill(bill, table);
    const computedTable = { ...table, tableId, label, locked, bill };
    emitTableUpdated(computedTable);
    // return table with locked = false since it was unlocked before calling get table
    return res.json({ ...computedTable, locked: false });
});api.post("/v1/bills/:billId", (req, res) => {
const { billId } = req.params;
const { tables, bills } = db.get();
const bill = bills.find(t => t.billId === billId);
if (!bill) {
return res.status(404).json({ error: "BILL_NOT_FOUND" });
}
const tableIndex = tables.findIndex(t => t.billId === billId);
if (tableIndex < 0) {
return res.status(404).json({ error: "TABLE_NOT_FOUND" });
}
const table = tables[tableIndex];
const { payment, end } = req.body;
if (end) {
// at the end of the payment, we "close" the table but keep the bills.
const { outstandingAmount } = computeBill(bill, table);
// if there is nothing due, "close" the table.
if (outstandingAmount === 0 && table.totalAmount !== 0) {
tables.splice(tableIndex, 1);
emitTableDeleted(table.tableId);
} else {
table.locked = false;
const { tableId, label, locked } = table;
const computedTable = {
...table,
tableId,
label,
locked,
bill: computeBill(bill, table)
};
emitTableUpdated(computedTable);
}
db.sync();
return res.send({ ok: true });
}
if (!bill.payments) {
bill.payments = [];
}
bill.payments.push(payment);
// re-lock in case it was force opened.
table.locked = true;
db.sync();
const computedBill = computeBill(bill, table);
const { tableId, label, locked } = table;
const computedTable = {
...table,
tableId,
label,
locked,
bill: computedBill
};
emitTableUpdated(computedTable);
return res.json(computedBill);
});Certification
It is required that you develop your integration and get it certified before developing the Pay at table feature. Pay at table must be developed at the end and certified separately. This is because it is an advanced feature so it is easier to test it separately.
Pay at table has its own test suite: Spice Pay at table test suite.
Updated 8 months ago